
Timber decking is a popular choice for outdoor spaces in Singapore. It adds beauty, functionality, and value to your home, creating a perfect area for relaxation, entertainment, and outdoor activities. While hiring professionals for timber and balcony decking installation is an option, many homeowners prefer the satisfaction of doing it themselves. This article will guide you through the steps, provide useful tips, and highlight common pitfalls to avoid when installing timber decking in Singapore.
Steps for DIY Timber Decking Installation
Step 1: Plan and Design Your Timber Decking
Before diving into the installation process, it is crucial to plan and design your timber decking. Consider the purpose of the deck, the desired shape and size, and any specific features of your timber decking. Take accurate measurements and create a detailed plan, including the placement of support posts, beams, and joists. This planning stage will ensure a smooth and successful installation.
Step 2: Clear and Prepare the Area
Clear the area where the timber decking will be installed and remove any existing structures, debris, or vegetation. Also, level the ground and ensure proper drainage. These steps are essential to providing a stable foundation and preparing the area for your timber decking. Consider using a string level to ensure the ground is level, and use a tamper to compact the soil.
Step 3: Install Support Posts and Beams
Support posts and beams are the backbone of your timber decking. To do so, dig holes for the support posts according to your plan and ensure they are evenly spaced. This is one of the crucial tips you should consider for DIY timber decking repair. And then, use a post-hole digger or an auger for this task. Next, install support posts and secure them to your deck with concrete. Once the support posts are in place, attach the beams to create the framework for your decking. Use galvanized brackets or joist hangers for a secure connection.
Step 4: Attach Joists
Joists provide additional support and stability to your timber decking. After positioning them, ensure they are attached to the joists and beams, evenly spaced, and level for optimum performance – a key aspect of the importance of spacing in timber decking. Also, use joist hangers or nails to secure the joists to the beams. It is important to follow the manufacturer’s instructions, especially for spacing, as this ensures the structural integrity of your timber decking.
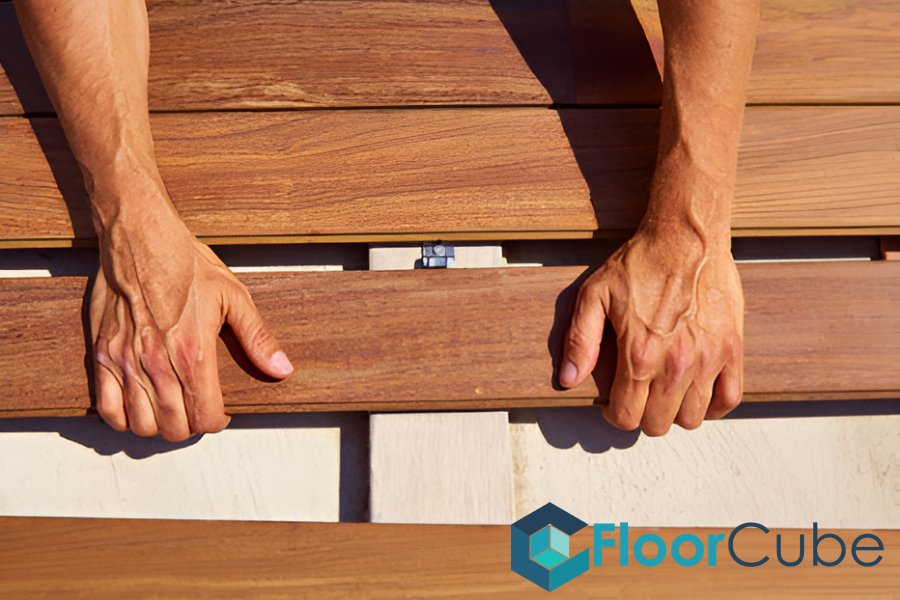
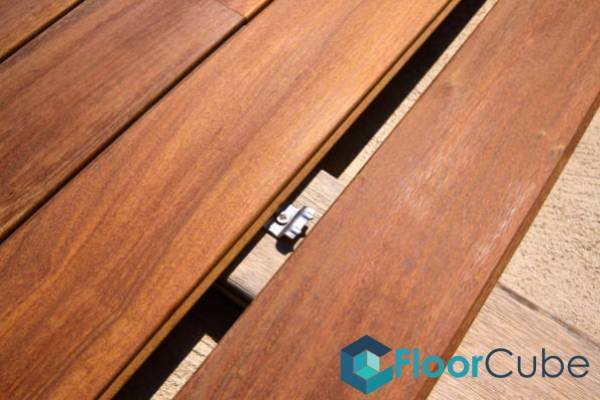
Step 5: Install Timber Decking Boards
Now, it’s time to install the timber decking boards, a step that brings you closer to realizing the benefits of timber decking. Start by placing the first board along the edge of the deck and securing it with screws or nails. After this, use spacers to maintain consistent spacing between the boards. Continue properly installing the boards for your timber decking, working your way across the deck. Lastly, trim the boards as necessary to fit the desired shape and size of your decking and ensure the boards are properly aligned and secured to the joists.
Step 6: Trim and Finish Your New Timber Decking
Once all the decking boards are installed, it’s time to trim and finish your new timber decking. Trim any excess boards and ensure the edges are smooth and even. After that, sand the surface of the deck to remove any rough spots or splinters. Next, apply a protective sealant or stain to enhance the durability and appearance of your timber decking. Again, follow the manufacturer’s instructions to ensure the proper application of the sealant or stain for timber decking.
Tips To Consider When Installing Timber Decking
It is essential to consider the following tips for DIY timber decking installation:
- Wear Appropriate Safety Gear: Always prioritize safety when working with tools and materials. Wear protective gloves, safety goggles, and a dust mask to protect yourself from potential hazards.
- Use High-Quality, Pressure-Treated Timber: Invest in high-quality, pressure-treated timber for your decking. This type of timber is resistant to rot, decay, and insect damage, ensuring the longevity of your deck. It’s crucial to understand the different types of wood decking to choose the best material that fits your needs and lifestyle.
- Follow The Manufacturer’s Instructions For Spacing: Proper spacing between decking boards is crucial for both aesthetic and structural reasons. Follow the manufacturer’s instructions to ensure the recommended spacing is maintained.
- Consider Using Hidden Fasteners For A Cleaner Look: Hidden fasteners provide a cleaner and more seamless appearance for your timber decking. They eliminate the need for visible screws or nails, enhancing the overall aesthetic appeal of your deck.
- Allow For Sufficient Ventilation: Proper ventilation is also critical to the longevity of your timber decking. Be sure to allow for sufficient gaps between the boards to promote air circulation and prevent moisture buildup, which can lead to rot and decay. Take note that implementing strategies to combat rot and decay in timber decking is extremely important in the long run.
Common Pitfalls to Avoid When Installing Timber Decking
To ensure a successful DIY timber decking installation, be aware of these common pitfalls and avoid them:
- Failing To Level The Ground Properly: A level and properly prepared ground are essential for a stable and durable deck. Failing to level the ground can result in an uneven deck surface and potential structural issues.
- Using Subpar Materials: The quality of the materials used in your timber decking project directly affects its longevity and durability. Therefore, choose high-quality materials for your timber decking to avoid premature deterioration and costly repairs.
- Incorrectly Spacing The Decking Boards: Improper spacing between decking boards can lead to various issues, such as warping, buckling, and moisture buildup. As such, follow the manufacturer’s instructions for the recommended spacing to ensure a structurally sound timber decking.
- Not Applying A Protective Sealant: Neglecting to apply a protective sealant or stain to your timber deck leaves it vulnerable to moisture damage, UV rays, and general wear and tear. You can protect your investment by regularly applying a sealant or stain for additional protection for your timber decking.
For professional timber decking services in Singapore, consider contacting FloorCube Singapore. Our experienced team can provide expert advice and assistance for all your timber decking needs.
Conclusion

DIY timber decking repair and installation in Singapore can be a rewarding project that enhances the beauty and functionality of your outdoor space. By following the steps outlined in this article, considering the provided tips, and avoiding common pitfalls, you can successfully create a stunning timber deck that you can enjoy for years to come. Remember to prioritize safety, use high-quality materials, and hire a professional for your timber decking when needed. With proper planning and care, your DIY timber decking installation will be a success.
Floorcube Singapore is a trusted provider of high-quality flooring and decking solutions in Singapore. With a focus on customer satisfaction, we offer a wide range of flooring options including vinyl flooring, parquet flooring, and wood flooring. We also offer a range of decking services including balcony decking, and timber decking. Our team of experienced professionals ensures professional installation and excellent service. Check out our website to explore our articles and services, and contact us for a personalized and transparent quotation or WhatsApp us at +65 8241 0032 for all your flooring and decking needs.